CSDN应该是大家接触到最多的博客平台了,所以一款能够发布到CSDN的自动化工具还是非常有必要的。
今天给大家讲讲自动化CSDN博客发布的思路和一些问题的解决办法。
解决问题的思路一定是最重要的,知识是死的,问题是活的,如何在工作中解决遇到的问题是我们需要面临的大问题。
前提条件
前提条件当然是先下载 blog-auto-publishing-tools这个博客自动发布工具,地址如下:https://github.com/ddean2009/blog-auto-publishing-tools
CSDN的实现
csdn的文章编辑页面进入很简单,在你已经登录的情况下,直接访问https://editor.csdn.net/md/就可以进入他的博客发布页面了。
具体实现的代码在publisher/csdn_publisher.py中。
标题
csdn的标题部分,没有ID,也没有name,只有一个孤零零的input。
那么我们怎么找到这个元素呢?
一个常用的办法是通过xpath和placeholder来定位到这个input元素。
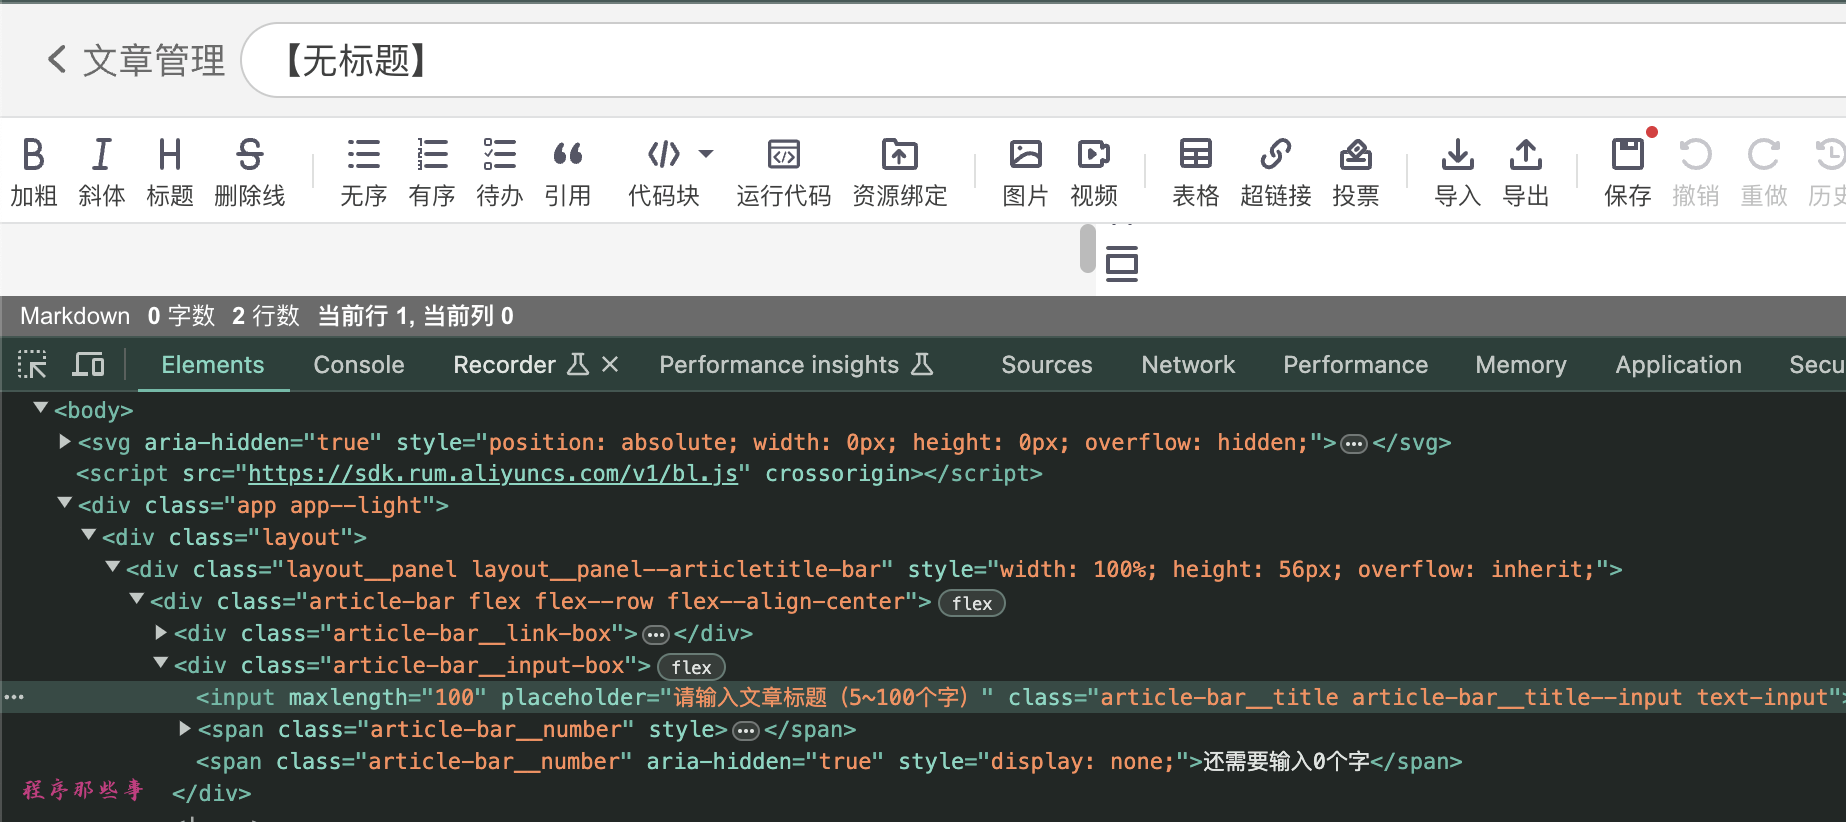
    # 文章标题
    title = driver.find_element(By.XPATH, '//div[contains(@class,"article-bar")]//input[contains(@placeholder,"请输入文章标题")]')
    title.clear()
    if 'title' in front_matter['title'] and front_matter['title']:
        title.send_keys(front_matter['title'])
    else:
        title.send_keys(common_config['title'])
    time.sleep(2)  # 等待3秒
文章内容
csdn的文章内容部分也是动态变动的,不是一个固定的textarea,但是看了它的代码,用的也不是常见的CodeMirror,我猜应该是自己实现的一个动态编辑器。
不过没关系,万变不离其宗。
既然不用使用send_keys来添加内容,我们就是用复制和拷贝大法来实现这个功能。
    # 文章内容 markdown版本
    file_content = read_file_with_footer(common_config['content'])
    # 用的是CodeMirror,不能用元素赋值的方法,所以我们使用拷贝的方法
    cmd_ctrl = Keys.COMMAND if sys.platform == 'darwin' else Keys.CONTROL
    # 将要粘贴的文本内容复制到剪贴板
    pyperclip.copy(file_content)
    action_chains = webdriver.ActionChains(driver)
    content = driver.find_element(By.XPATH, '//div[@class="editor"]//div[@class="cledit-section"]')
    content.click()
    time.sleep(2)
    # 模拟实际的粘贴操作
    action_chains.key_down(cmd_ctrl).send_keys('v').key_up(cmd_ctrl).perform()
    time.sleep(3)  # 等待3秒
拷贝就是通用的流程了。
但是拷贝之前,我们需要先定位到拷贝的地址。
��这里我用的是xpath定位到editor class下面的cledit-section。
定位之后,按下click按钮,然后直接粘贴内容即可。
发布文章按钮
内容都输入好之后,我们就可以点击右边的发布文章按钮了。
csdn的按钮没有id,所以我们还是得使用xpath来定位到这个button。
    # 发布文章
    send_button = driver.find_element(By.XPATH, '//button[contains(@class, "btn-publish") and contains(text(),"发布文章")]')
    send_button.click()
    time.sleep(2)
点击发布文章后,会有一个弹窗框:
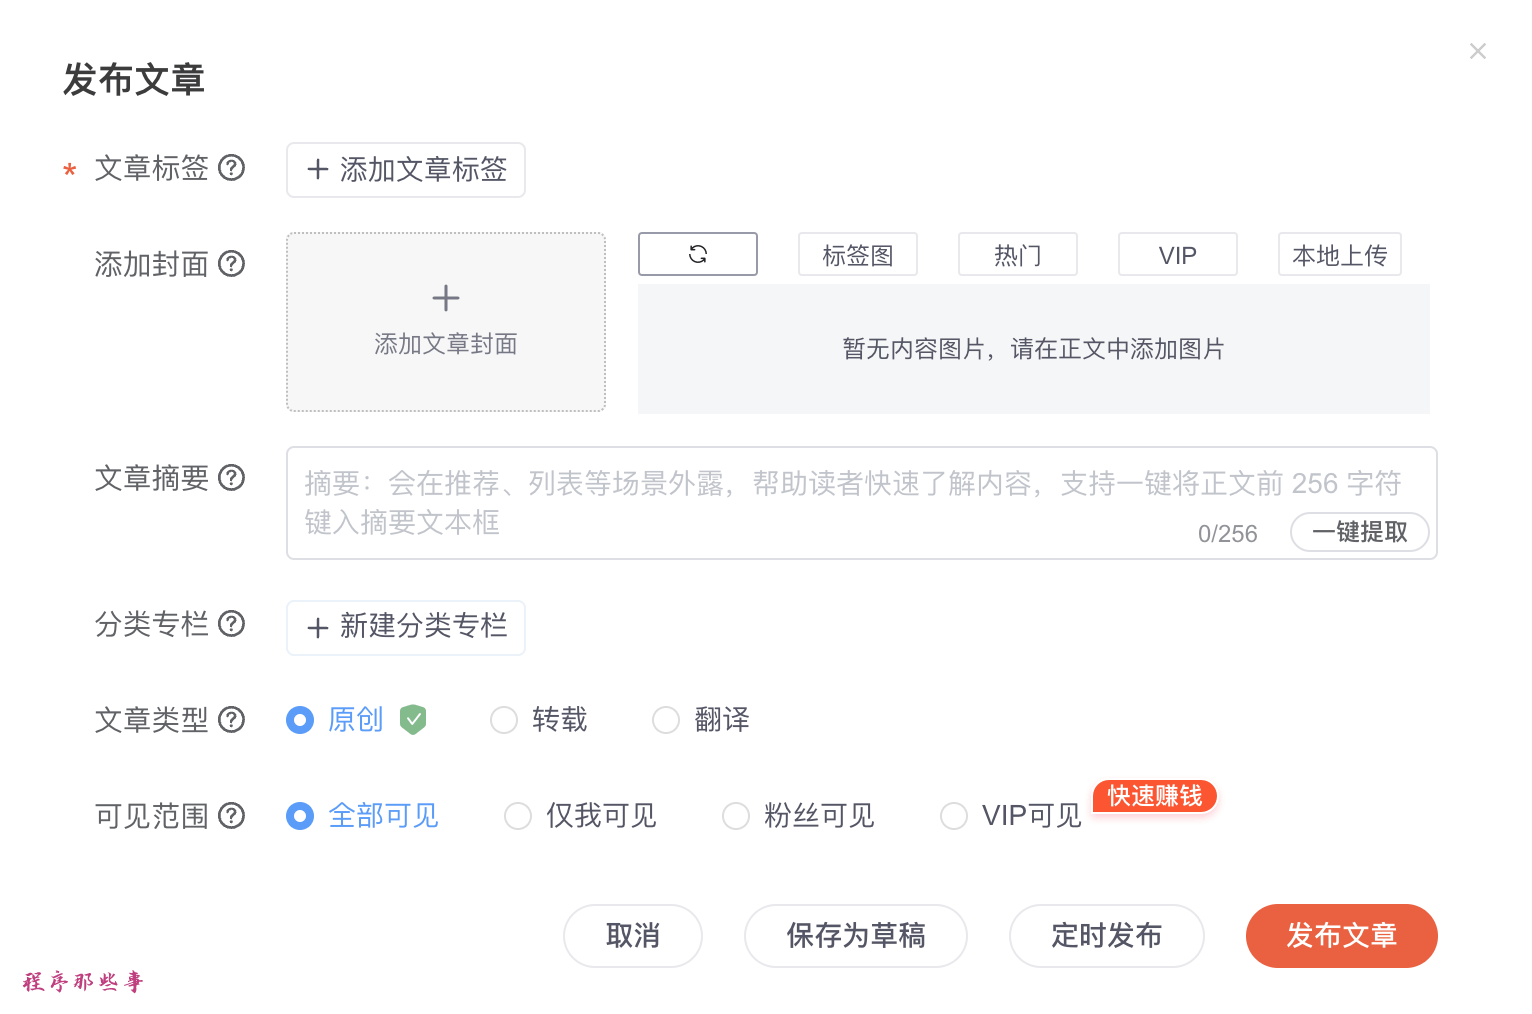
这个弹出框里面是需要填写的一些额外信息。比如文章标签,添加封面,文章摘要,分类专栏,文章类型和可见范围等等内容。
文章标签
添加文章标签的路径有点复杂。
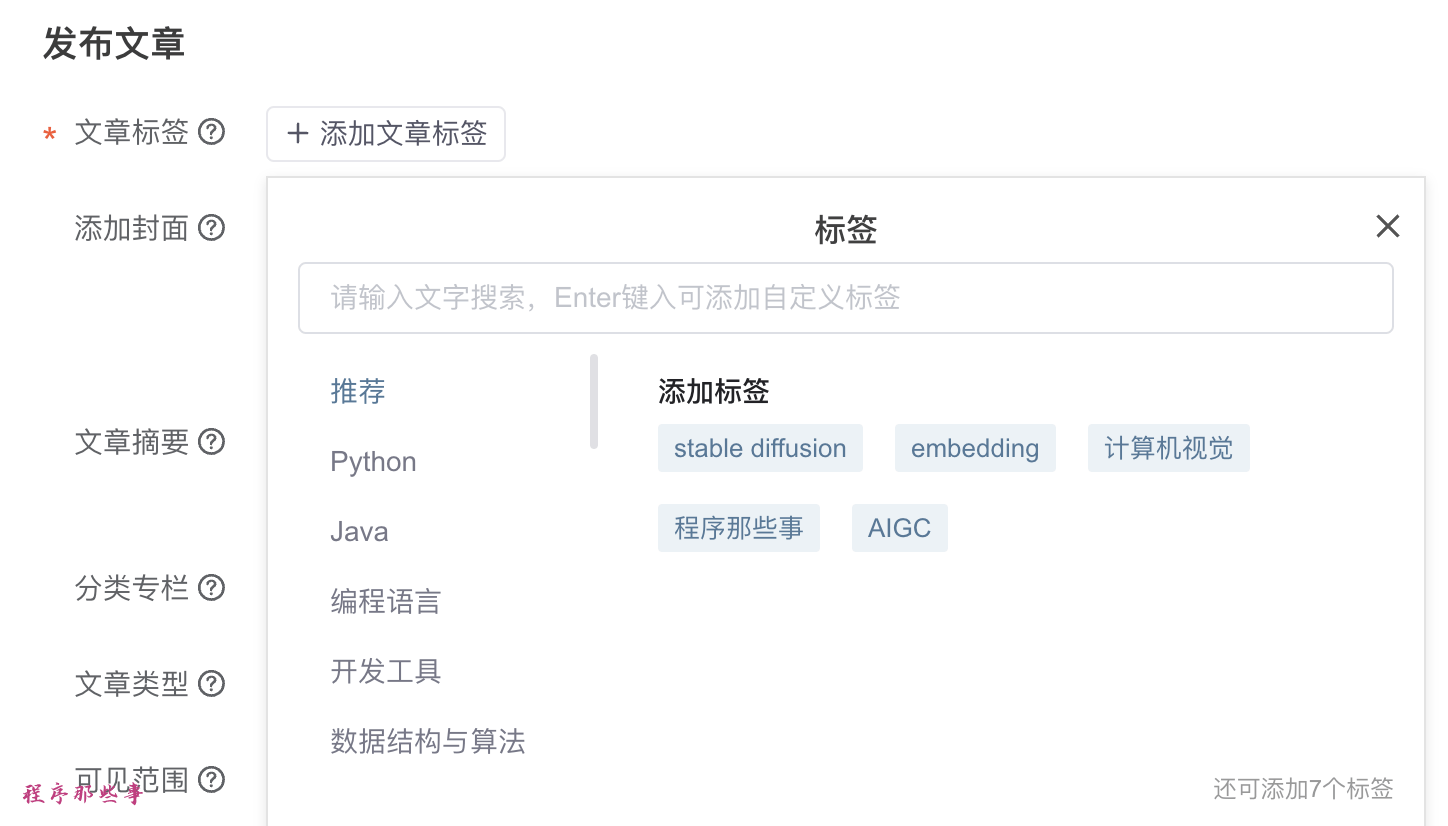
首先我们点击添加文章标签按钮,这时候又会弹出一个对话框。
在这个对话框里面,我们需要文字搜索框,输入tag,然后回车,然后继续输入tag,继续回车。
做完所有的操作之后,还需要点击右上角的x关闭按钮,把这个弹出框关闭。
    # 文章标签
    if 'tags' in front_matter and front_matter['tags']:
        tags = front_matter['tags']
    else:
        tags = csdn_config['tags']
    if tags:
        add_tag = driver.find_element(By.XPATH,
                                        '//div[@class="mark_selection"]//button[@class="tag__btn-tag" and contains(text(),"添加文章标签")]')
        add_tag.click()
        time.sleep(1)
        tag_input = driver.find_element(By.XPATH, '//div[@class="mark_selection_box"]//input[contains(@placeholder,"请输入文字搜索")]')
        for tag in tags:
            tag_input.send_keys(tag)
            time.sleep(2)
            tag_input.send_keys(Keys.ENTER)
            time.sleep(1)

        # 关闭按钮
        close_button = driver.find_element(By.XPATH, '//div[@class="mark_selection_box"]//button[@title="关闭"]')
        close_button.click()
        time.sleep(1)
添加封面
CSDN的封面会自动检测文章内容中的图片,把这些图片设置为文章的封面。
当然我们也可以自行设置。
    if 'image' in front_matter and front_matter['image']:
        file_input = driver.find_element(By.XPATH, "//input[@type='file']")
        # 文件上传不支持远程文件上传,所以需要把图片下载到本地
        file_input.send_keys(download_image(front_matter['image']))
        time.sleep(2)
要注意的是,这里的image地址是在markdown文件中的yaml front matter中设置的。
如图所示:

设置摘要
csdn的摘要部分也没有ID,还是需要通过xpath来进行获取。
这里通过textarea的placeholder来进行获取。
    # 摘要
    if 'description' in front_matter['description'] and front_matter['description']:
        summary = front_matter['description']
    else:
        summary = common_config['summary']
    if summary:
        summary_input = driver.find_element(By.XPATH, '//div[@class="desc-box"]//textarea[contains(@placeholder,"摘要:会在推荐、列表等场景外露")]')
        summary_input.send_keys(summary)
        time.sleep(2)
分类专栏
csdn的分类专栏需要提前创建好。
每个专栏都是一个checkbox,我们可以通过checkbox的value来定位到这个专栏选项。
实现代码如下:
    # 分类专栏
    categories = csdn_config['categories']
    if categories:
        for category in categories:
            category_input = driver.find_element(By.XPATH, f'//input[@type="checkbox" and @value="{category}"]/..')
            category_input.click()
            time.sleep(1)
可见范围
最后可以设置的就是文字的可见范围了。
可见范围是有id的,我们可以根据id来获取到这个input,然后点击他。
    # 可见范围
    visibility = csdn_config['visibility']
    if visibility:
        visibility_input = driver.find_element(By.ID, visibility)
        visibility_input.click()
最后的发布
最后,我们终于可以发布了。
csdn的发布按钮也没有id,我们只能通过对应的class和button的text内容来定位到发布按钮。
    # 发布
    if auto_publish:
        publish_button = driver.find_element(By.XPATH, '//div[@class="modal__button-bar")]//button[contains(text(),"发布文章")]')
        publish_button.click()
总结
CSDN的实现还是比较复杂的,因为涉及到的东西比较多。大家可以好好琢磨琢磨。