5. 在wildfly 21中搭建cluster集群
简介
wildfly是一个非常强大的工具,我们可以轻松的使用wildfly部署应用程序,更为强大的是,wildfly可以很方便的部署cluster应用。
今天我们通过一个例子来讲解下wildfly如何构建cluster应用。
下载软件和相关组件
假如我们有两个host,一个称为master,一个称为slave,我们需要在两个机子上面安装wildfly,构建成domain模式。然后需要在Domain controller主机上面安装mod_cluster和httpd以组成集群。

首先我们需要下载wildfly-21.0.0.Final.zip,解压之后,运行domain.sh以开启domain模式。
配置domain
我们需要将master配置为domain controller,根据我们之前的文章,首先配置interfaces,我们需要修改domain/configuration/host.xml:
<interfaces>
    <interface name="management"
        <inet-address value="${jboss.bind.address.management:10.211.55.7}"/>
    </interface>
    <interface name="public">
       <inet-address value="${jboss.bind.address:10.211.55.7}"/>
    </interface>
    <interface name="unsecured">
       <inet-address value="10.211.55.7" />
    </interface>
</interfaces>
因为我们master的ip地址是10.211.55.7,所以需要修改相应的值。这里使用的是master对外的ip地址,从而可以供slave连接到master。
同样的,我们需要修改slave的interface值:
<interfaces>
    <interface name="management">
        <inet-address value="${jboss.bind.address.management:10.211.55.2}"/>
    </interface>
    <interface name="public">
       <inet-address value="${jboss.bind.address:10.211.55.2}"/>
    </interface>
    <interface name="unsecured">
       <inet-address value="10.211.55.2" />
    </interface>
</interfaces>
也需要修改相应的ip地址。
接下来是修改host name :
//master
<host name="master" xmlns="urn:jboss:domain:3.0">
//slave
<host name="slave" xmlns="urn:jboss:domain:3.0">
在slave中,我们还需要配置domain-controller,从而让slave可以连接到master:
<domain-controller>
 <remote security-realm="ManagementRealm" >
   <discovery-options>
     <static-discovery name="master-native" protocol="remote"  host="10.211.55.7" port="9999" />
     <static-discovery name="master-https" protocol="https-remoting" host="10.211.55.7" port="9993" security-realm="ManagementRealm"/>
     <static-discovery name="master-http" protocol="http-remoting" host="10.211.55.7" port="9990" />
   </discovery-options>
 </remote>
</domain-controller>
接下来,我们需要创建用于连接的security-realm,通过add-user.sh命令,我们可以创建添加用户。
这里我们创建两个用户,第一个用户叫做admin,使用来进行domain管理的用户。
第二个用户叫做slave,这个用户用来slave连接到master。
还记得add-user.sh命令是怎么用的吗?下面是创建admin用户的输出:
./add-user.sh

Enter the details of the new user to add.
Realm (ManagementRealm) :
Username : admin
Password recommendations are listed below. To modify these restrictions edit the add-user.properties configuration file.
 - The password should not be one of the following restricted values {root, admin, administrator}
 - The password should contain at least 8 characters, 1 alphabetic character(s), 1 digit(s), 1 non-alphanumeric symbol(s)
 - The password should be different from the username
Password : passw0rd!
Re-enter Password : passw0rd!
The username 'admin' is easy to guess
Are you sure you want to add user 'admin' yes/no? yes
About to add user 'admin' for realm 'ManagementRealm'
Is this correct yes/no? yes
如果是slave用户,则需要在下面的问题提示的时候,回答yes
Is this new user going to be used for one AS process to connect to another AS process?
e.g. for a slave host controller connecting to the master or for a Remoting connection for server to server EJB calls.
yes/no? yes
To represent the user add the following to the server-identities definition <secret value="cGFzc3cwcmQh" />
有了slave用户,我们就可以使用这个用户来配置slave的ManagementRealm了:
<security-realms>
   <security-realm name="ManagementRealm">
       <server-identities>
           <secret value="cGFzc3cwcmQh" />
           <!-- This is required for SSL remoting -->
           <ssl>
             <keystore path="server.keystore" relative-to="jboss.domain.config.dir" keystore-password="jbossas" alias="jboss" key-password="jbossas"/>
           </ssl>
       </server-identities>
       <authentication>
           <properties path="mgmt-users.properties" relative-to="jboss.domain.config.dir"/>
       </authentication>
   </security-realm>
</security-realms>
这样配置过后,slave和master就可以进行连接了。
创建应用程序
这里我引用的是官网的demo程序。实际上就是一个非常简单的web应用。代码地址 https://github.com/liweinan/cluster-demo/ 。
我们简单进行一下讲解,基本的代码逻辑就是在session中存放一个时间数据,然后尝试从不同的server中取出,看是否一致,如果一致的话说明cluster集群是有效的。
//设置session的值
session.setAttribute("current.time", new java.util.Date());
//获取session的值
session.getAttribute("current.time")
cluster中最重要的就是session共享,或者说session复制。我们可以简单的在web.xml中使用distributable标签即可。
<web-app>
  <display-name>Archetype Created Web Application</display-name>
   <distributable/>
</web-app>
这就是我们应用程序的全部了。
部署应用程序
这次我们从web console中进行应用程序的部署。
打开 http://10.211.55.7:9990 ,输入我们创建的admin用户名和密码,即可进入管理界面。
默认情况下,会创建3个服务,分别是server-one,server-two和server-three。
server-one,server-two是默认启动的,他们属于main-server-group。而server-three是不启动的,它属于other-server-group。
我们看下other-server-group的配置:
<server-group name="other-server-group" profile="full-ha">
            <jvm name="default">
                <heap size="64m" max-size="512m"/>
            </jvm>
            <socket-binding-group ref="full-ha-sockets"/>
        </server-group>
other-server-group使用的profile是full-ha,看名字就知道整个profile是为高可用设计的。那么这个profile有什么特别之处呢?
<profile name="full-ha">
...
<subsystem xmlns="urn:jboss:domain:modcluster:5.0">
                <proxy name="default" advertise-socket="modcluster" listener="ajp">
                    <dynamic-load-provider>
                        <load-metric type="cpu"/>
                    </dynamic-load-provider>
                </proxy>
</subsystem>

<subsystem xmlns="urn:jboss:domain:infinispan:11.0">
...
</subsystem>

<subsystem xmlns="urn:jboss:domain:jgroups:8.0">
                <channels default="ee">
                    <channel name="ee" stack="udp" cluster="ejb"/>
                </channels>
                <stacks>
                    <stack name="udp">
                       ...
                    </stack>
                    <stack name="tcp">
                       ...
                    </stack>
                </stacks>
            </subsystem>
...
</profile>
这个profile中和ha有关的就是infinispan,jgroup和modcluster。通过这些组件,wildfly就可以来进行cluster的组建。
因为server-three默认是停止状态的,我们需要在master和slave中分别启动他们。
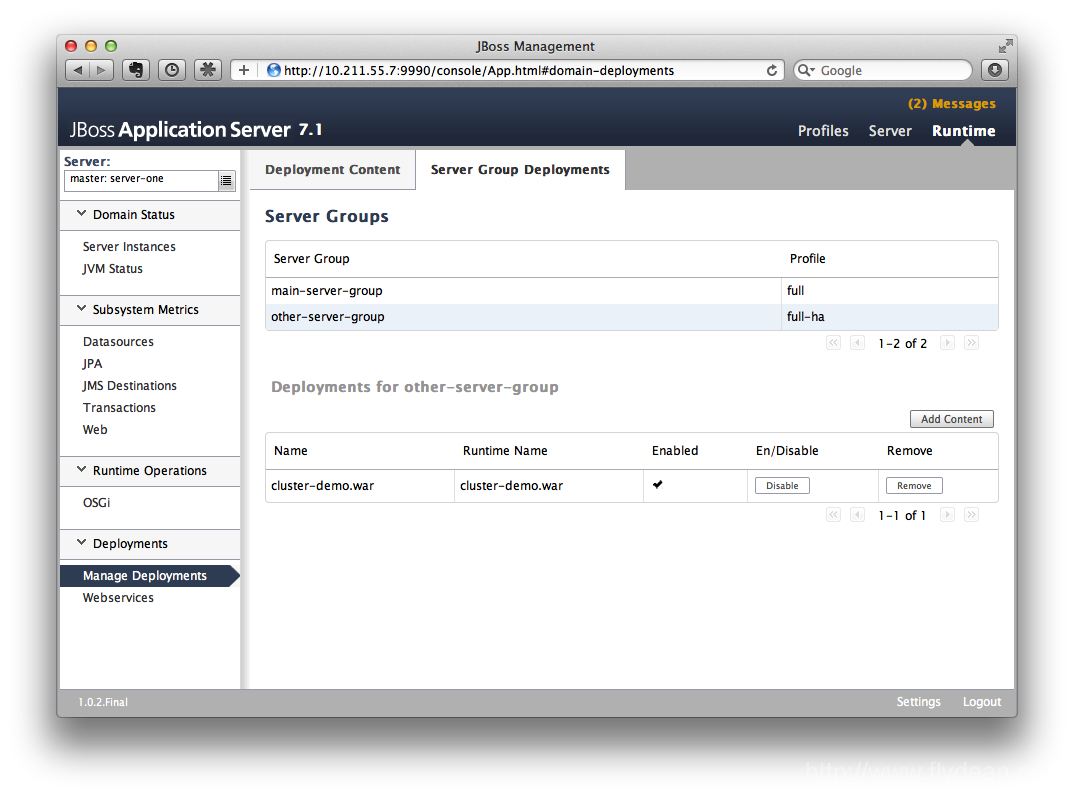
在Manage Deployments页面,点击Add Content,然后选择我们之前的demo应用程序cluster-demo.war,上传即可。
好了,程序已经部署好了,我们可以分别访问:
http://10.211.55.7:8330/cluster-demo/ 和 http://10.211.55.2:8330/cluster-demo/ 来查看应用程序的页面。
现在为止,两个应用程序还是独立的,并没有组合成cluster,接下来我们将会进行cluster的配置。
还有一点要注意的是,我们需要将master和slave中的server-three修改成不同的名字,如果是相同的名字,那么我们在后面使用的mod_cluster将会报错,因为在同一个server group中不允许出现两个相同的名字。
<server name="server-three" group="other-server-group" auto-start="true">
    <socket-bindings port-offset="250"/>
</server>

<server name="server-three-slave" group="other-server-group" auto-start="true">
    <socket-bindings port-offset="250"/>
</server>
集群配置
软件部署好之后,我们需要在master机子上面使用mod_cluster + apache httpd 来启用集群功能。
首先安装httpd:
sudo yum install httpd
然后下载mod_cluster:
http://www.jboss.org/mod_cluster/downloads
将其解压缩到 /etc/httpd/modules ,然后修改 /etc/httpd/conf/httpd.conf
添加下面的modules:
LoadModule slotmem_module modules/mod_slotmem.so
LoadModule manager_module modules/mod_manager.so
LoadModule proxy_cluster_module modules/mod_proxy_cluster.so
LoadModule advertise_module modules/mod_advertise.so
并且注释掉下面的modules:
#LoadModule proxy_balancer_module modules/mod_proxy_balancer.so
因为proxy_balancer_module是和proxy_cluster_module相冲突的。
然后修改httpd监听 10.211.55.7:80。
最后还要在httpd.conf中配上mod_cluster-manager的监听端口:
<VirtualHost 10.211.55.7:10001>

  <Directory />
    Order deny,allow
    Deny from all
    Allow from 10.211.55.
  </Directory>


  # This directive allows you to view mod_cluster status at URL http://10.211.55.4:10001/mod_cluster-manager
  <Location /mod_cluster-manager>
   SetHandler mod_cluster-manager
   Order deny,allow
   Deny from all
   Allow from 10.211.55.
  </Location>

  KeepAliveTimeout 60
  MaxKeepAliveRequests 0

  ManagerBalancerName other-server-group
  AdvertiseFrequency 5

</VirtualHost>
我们可以使用service httpd start启动httpd服务即可。
我们可以通过访问 http://10.211.55.7/cluster-demo/ 来访问集群服务了。
注意,虽然是集群模式,但是我们所有的请求都要先到master机子上面做转发。
总结
wildfly内置了很多强大的组件支持,不愧为工业标准的典范。值的学习。
本文作者:flydean程序那些事
本文链接:www.flydean.com
本文来源:flydean的博客
欢迎关注我的公众号:「程序那些事」最通俗的解读,最深刻的干货,最简洁的教程,众多你不知道的小技巧等你来发现!
点我查看更多精彩内容:www.flydean.com